
Windows Event Forwarding (WEF) is a service available on Microsoft Windows platforms which enables the forwarding of events from Windows Event Log to a central Windows Event Collector. Since the technology is built into the operating system, this means you can centralize log collection without having to install third party software on each Windows node. You can also use Group Policy for configuring clients to forward their events. This approach not only standardizes client management but also streamlines it.
Unfortunately there is one caveat. Events are sent over the WS-Eventing protocol (part of the WS-Management protocol) and this typically limits the Windows Event Collector to a Windows server, which may not be practical in environments where Windows servers are not common. NXLog addresses this problem through its Windows Event Collector (im_wseventing) module, allowing a Windows Event Collector to be set up on GNU/Linux systems.
In this post, we will show you how to set up a WEC server on Linux using either Kerberos or certificate-based authentication. These instructions have been verified on RHEL/CentOS 8 and Ubuntu 20.04 for the WEC server, and on Microsoft Windows Server 2016 for Active Directory and WEF clients. Note that the steps may differ on other versions and operating systems.
Going forward, we will refer to the Linux host where NXLog is installed as the WEC server and the Windows machine forwarding events to it as the WEF client.
Configure a WEC server with Kerberos authentication
These steps will guide you through setting up Kerberos authentication, configuring a WEC server, and forwarding events to it from a WEF client. This example setup uses three distinct hosts:
-
A Windows Active Directory Domain Controller with FQDN
dc.example.comand IP address192.168.0.1. -
A Windows based DNS server with IP address
192.168.0.2. -
A Linux host where NXLog is installed with hostname
linux-wecand IP address192.168.0.3.
WEC server prerequisites
Before configuring Kerberos authentication, the Linux host acting as a WEC server needs to satisfy the following requirements.
-
Check that the machine has the correct hostname:
# hostnameIf the command does not return a value or the value is incorrect, update the hostname:
# hostnamectl set-hostname linux-wec -
Configure network settings with the correct DNS server and a static IP address.
To set network settings on RHEL/CentOS (replace
ifcfg-enp0s3with the correct interface name):# nano /etc/sysconfig/network-scripts/ifcfg-enp0s3Set to:
BOOTPROTO=static
IPADDR=192.168.0.3
NETMASK=255.255.255.0
GATEWAY=192.168.0.1
DNS1=192.168.0.2
To set network settings on Ubuntu 18.04 and newer:
-
Open the Netplan YAML configuration file (replace the filename with the relevant one on your system):
# nano /etc/netplan/01-network-manager-all.yaml -
Set to (replace
enp0s3with the correct interface name):network: version: 2 renderer: NetworkManager ethernets: enp0s3: dhcp4: no addresses: - 192.168.0.3/24 gateway4: 192.168.0.1 nameservers: addresses: [192.168.0.2]Note that using correct indentation is very important or the settings will not be applied.
-
Apply the changes:
# netplan apply
-
-
Synchronize the time with the domain controller.
To synchronize the time using NTP execute the following command:
# ntpdate dc.example.comTo synchronize the time using chrony:
-
Open the chrony configuration file with a text editor:
# nano /etc/chrony.conf -
Replace the current server or pool with the following line:
server dc.example.com iburst
-
Create and map an Active Directory domain user
For a WEC server on a Linux machine to be able to use Kerberos authentication, a corresponding user needs to be created in Active Directory and mapped to a Kerberos principal name.
-
On the domain controller, create a new user with its logon name matching the hostname of the WEC server.
-
Go to Administrative Tools > Active Directory Users and Computers > example.com > Users.
-
Right click and choose New > User.
-
First name:
linux-wec -
Full name:
linux-wec -
User logon name:
linux-wec -
Set a password for the user.
-
Uncheck User must change password at next logon.
-
Check Password never expires.
-
-
Right click on the new user, click Properties, and open the Account tab.
-
Check This account supports Kerberos AES 128 bit encryption.
-
Check This account supports Kerberos AES 256 bit encryption.
-
-
-
On the DNS server, create an A record for
linux-wec.example.com.-
Go to Administrative Tools > DNS > Forward Lookup Zones > example.com.
-
Right click and choose New Host (A or AAAA)….
-
Add a record with name
linux-wecand IP address192.168.0.3. -
Check the Create associated pointer (PTR) record option.
-
-
Back on the domain controller, open a command prompt and execute these commands. Use the same
<password>that was specified when the above user was created. These commands map the domain account to the Kerberos principal names and generate two keytab files containing the shared secret.> ktpass /princ hosts/linux-wec.example.com@EXAMPLE.COM /pass <password> /mapuser EXAMPLE\linux-wec -pType KRB5_NT_PRINCIPAL /out hosts-nxlog.keytab /crypto AES256-SHA1> ktpass /princ http/linux-wec.example.com@EXAMPLE.COM /pass <password> /mapuser EXAMPLE\linux-wec -pType KRB5_NT_PRINCIPAL /out http-nxlog.keytab /crypto AES256-SHA1 -
Copy the resulting
hosts-nxlog.keytabandhttp-nxlog.keytabfiles to the WEC server.
Configure Kerberos on the WEC server
Now that the Active Directory user has been created and mapped to the principal name, the WEC server can be configured for Kerberos authentication.
-
Confirm that the Kerberos krb5 client and utility software are installed on the WEC server. The required package can be installed with
yum install krb5-workstationorapt install krb5-user. -
Edit the default Kerberos configuration file, usually located at
/etc/krb5.conf.-
In section
[domain_realm]add:.example.com = EXAMPLE.COM example.com = EXAMPLE.COM -
In section
[realms]add:EXAMPLE.COM = { kdc = example.com admin_server = example.com }
-
-
Use
ktutilto merge the two keytab files generated above.# ktutil ktutil: rkt /root/hosts-nxlog.keytab ktutil: rkt /root/http-nxlog.keytab ktutil: wkt /root/nxlog-result.keytab ktutil: q -
Validate the merged keytab.
# klist -e -k -t /root/nxlog-result.keytab Keytab name: FILE:/root/nxlog-result.keytab KVNO Timestamp Principal ---- ------------------- ------------------------------------------------------ 5 17.01.2021 04:20:08 hosts/linux-wec.example.com@EXAMPLE.COM (aes256-cts-hmac-sha1-96) 4 17.01.2021 04:20:08 http/linux-wec.example.com@EXAMPLE.COM (aes256-cts-hmac-sha1-96) -
Either copy the keytab into place, or merge it if there are already keys in
/etc/krb5.keytab.-
To copy the keytab:
# cp /root/nxlog-result.keytab /etc/krb5.keytab -
To merge the keytab and validate the result:
# ktutil
ktutil:  rkt /etc/krb5.keytab
ktutil:  rkt /root/nxlog-result.keytab
ktutil:  wkt /etc/krb5.keytab
ktutil:  q
# klist -e -k -t /etc/krb5.keytab Keytab name: FILE:/etc/krb5.keytab KVNO Timestamp Principal ---- ------------------- ------------------------------------------------------ <other entries> 5 17.01.2021 04:20:08 hosts/linux-wec.example.com@EXAMPLE.COM (aes256-cts-hmac-sha1-96) 4 17.01.2021 04:20:08 http/linux-wec.example.com@EXAMPLE.COM (aes256-cts-hmac-sha1-96)
-
-
Verify that the user account used by the NXLog service has sufficient privileges to open and read the
/etc/krb5.keytabfile. If not, Kerberos authentication will fail. -
Test that the authentication with Active Directory is working successfully when using the keytab. Run the following command on the Linux WEC server. If the configuration is correct a ticket-granting ticket (TGT) will be created and cached. This command should be invoked with the same user that the NXLog service runs as. By default, it uses the
nxloguser account.# kinit -kt /etc/krb5.keytab http/linux-wec.example.com@EXAMPLE.COM -
Verify the ticket was obtained by running
klistas the same user from the previous step:# klist Ticket cache: KCM:0 Default principal: http/linux-wec.example.com@EXAMPLE.COM Valid starting Expires Service principal 28/01/21 11:41:44 28/01/21 21:41:44 krbtgt/EXAMPLE.COM@EXAMPLE.COM renew until 04/02/21 11:41:44
Configure NXLog to receive events
Once you verify that Kerberos authentication is working successfully, the next step is to configure NXLog with the Windows Event Collector (im_wseventing) module to receive events from WEF clients.
-
Open the NXLog configuration file with a text editor. On Linux the default location is
/opt/nxlog/etc/nxlog.conf. -
Add an input module instance of im_wseventing as follows. This configuration uses all network interfaces to listen for connections on port 80, and filters for events from the Application, Security, and System channels.
nxlog.conf<Input windows_events> Module im_wseventing Address http://linux-wec.example.com:80/wsman ListenAddr 0.0.0.0 Port 80 <QueryXML> <QueryList> <Query Id="0"> <Select Path="Application">*</Select> <Select Path="Security">*</Select> <Select Path="System">*</Select> </Query> </QueryList> </QueryXML> # Log connections for testing and troubleshooting LogConnections TRUE </Input>NoteMake sure the port defined in the im_wseventing configuration is accessible from the WEF clients. The local firewall rules on the Linux WEC server may need to be updated. -
Restart the NXLog service:
# systemctl restart nxlog
Configure the WEF client to send events to NXLog
Finally, WEF clients can be configured to forward their events to the newly set up WEC server. Follow these steps to enable WEF on a single Windows node by editing the local policy.
-
Open the Group Policy MMC snap-in (
gpedit.msc) and go to Computer Configuration > Administrative Templates > Windows Components > Event Forwarding.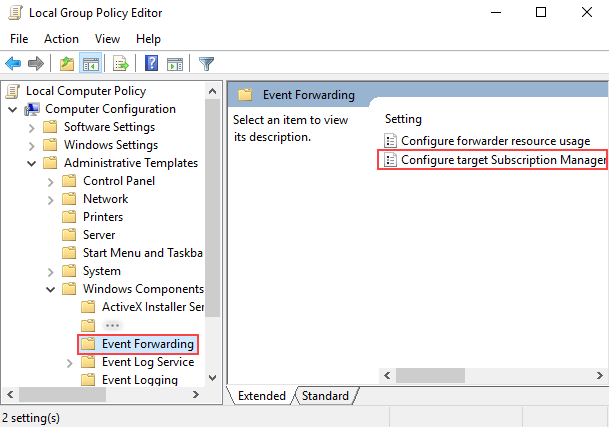
-
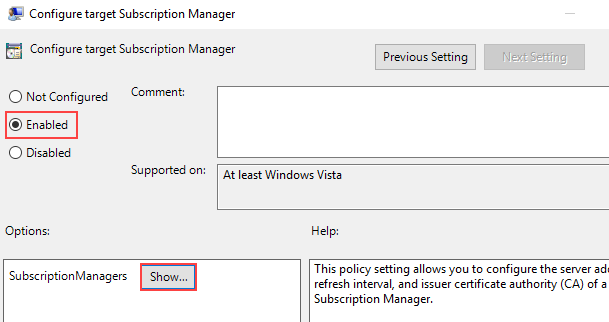
Right-click the Configure target Subscription Manager setting and select Properties. Enable the setting, and under Options click the Show button to add a server address.
-
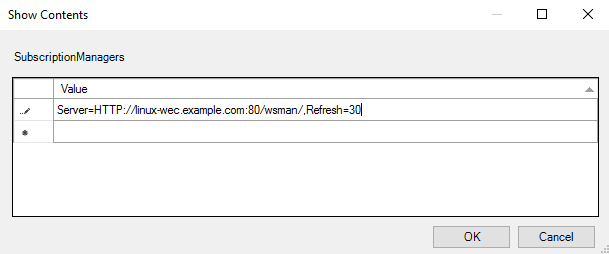
Add at least one setting that specifies the NXLog WEC server. The SubscriptionManager Properties window contains a Help pane that describes the syntax for the setting. An example would be as follows:
Server=http://linux-wec.example.com:80,Refresh=30
 Note
NoteThe Refreshinterval represents the time in seconds and on production systems should be set to a higher value e.g.Refresh=1200. -
After the SubscriptionManager setting has been added, ensure the policy is applied by running:
> gpupdate /force -
If you are planning to forward security events, you will need to grant the NetworkService account access to the Security log. See Forwarding events from the Security log in the NXLog Reference Manual for instructions.
-
At this point the WinRM service on the Windows client should connect to NXLog. If the LogConnections directive is set to
TRUEin the NXLog configuration, a connection attempt should be logged innxlog.logand you should start seeing events as they arrive.
Configure a WEC server with certificate-based authentication (HTTPS)
These steps will guide you through generating the required certificates using OpenSSL, setting up a WEC server with HTTPS, and forwarding events to it from a WEF client. This example setup uses two distinct hosts:
-
A Linux host where NXLog is installed with hostname
linux-wec. -
A Windows host which will be configured as a WEF client with hostname
winclient.
Generate the certificates
To facilitate the generation of certificates using OpenSSL, scripts are available in our public git repository.
-
Download the scripts to the Linux WEC server. You may want to edit the subject parameters according to your environment.
-
Generate the CA certificate and private key.
# ./genca.sh -
Generate the WEF client certificate and export it together with the CA in PFX format. This is the certificate that you will need to import into the Windows certificate store on the WEF client later on.
# ./gencert-client.sh winclient.example.com -
Generate the WEC server certificate to be used by the NXLog configuration. Make sure that the hostname you specify matches the reverse DNS name of the WEC server, otherwise you may encounter errors when configuring the WEF client because the SSL certificate contains a common name (CN) that does not match the hostname.
# ./gencert-server.sh linux-wec.example.com
If you are using an intermediary CA you will need to make sure that the
ca-cert.pem file contains the public part of every issuer’s certificate in the
correct order. The easiest way to achieve this is to 'cat' the pem
certificates together.
If you do not use the provided scripts to generate the certificates, make sure that the following requirements are met:
-
The WEF client certificate must have the
X509 v3 Extended Key Usage: TLS Web Client Authenticationextension. -
The WEC server certificate must have the
X509 v3 Extended Key Usage: TLS Web Server Authenticationextension. -
Make sure that the intended purpose of the certificates are set to Client Authentication and Server Authentication respectively.
Configure NXLog to receive events
Once the certificates have been generated, the next step is to configure NXLog with the Windows Event Collector (im_wseventing) module to receive events from WEF clients.
-
Open the NXLog configuration file with a text editor. On Linux the default location is
/opt/nxlog/etc/nxlog.conf. -
Add an input module instance of im_wseventing as follows. This configuration uses all network interfaces to listen for connections on port 5985, and filters for events from the Application, Security, and System channels.
nxlog.conf<Input windows_events> Module im_wseventing Address https://linux-wec.example.com:5985/wsman ListenAddr 0.0.0.0 Port 5985 HTTPSCertFile /path/to/server-cert.pem HTTPSCertKeyFile /path/to/server-key.pem HTTPSCAFile /path/to/ca-cert.pem <QueryXML> <QueryList> <Query Id="0"> <Select Path="Application">*</Select> <Select Path="Security">*</Select> <Select Path="System">*</Select> </Query> </QueryList> </QueryXML> # Log connections for testing and troubleshooting LogConnections TRUE </Input>NoteMake sure the port defined in the im_wseventing configuration is accessible from the WEF clients. The local firewall rules on the Linux WEC server may need to be updated. -
Restart the NXLog service:
# systemctl restart nxlog
Configure the WEF client to send events to NXLog
At this stage, you are ready to configure WEF clients to forward their events to the newly set up WEC server. Follow these steps to configure the WinRM authentication method and enable WEF on a Windows node.
-
Make sure the Windows Remote Management (WS-Management) service is installed, running, and set to Automatic startup type.
-
If WinRM is not already installed, see the MSDN documentation on Installation and Configuration for Windows Remote Management.
-
Check that certificate-based authentication is enabled for WinRM. Run the following command:
> winrm get winrm/config/Client/AuthThis should produce the following output:
 Auth
 Basic = false
 Digest = true
 Kerberos = true
 Negotiate = true
 Certificate = true
 CredSSP = true [Source="GPO"]
If Certificate authentication is set to false, enable it with the following command:
> winrm set winrm/config/client/auth @{Certificate="true"} -
Import the WEF client authentication certificate. Open the Certificates MMC snap-in for the Local Computer (
certlm.msc), right click on Personal and select All Tasks > Import…. Import theclient.pfxfile. Enter the private key password if set and make sure the Include all extended properties check-box is selected.NoteAfter the import is complete, expand Personal > Certificates and double-click on the WEF client certificate to check if the full certificate chain is available and trusted. -
The NetworkService account needs to be granted permission to access the WEF client certificate. Use the Windows HTTP Services Certificate Configuration Tool (WinHttpCertCfg.exe) to check if the NetworkService account has the correct access permission:
> winhttpcertcfg -l -c LOCAL_MACHINE\my -s <certificate subject name>Where
LOCAL_MACHINE\myrefers to thePersonalcertificate store of theLocal Computerand<certificate subject name>is theCNvalue that was specified when creating the WEF client certificate. For example:> winhttpcertcfg -l -c LOCAL_MACHINE\my -s winclient.example.comIf NetworkService is not listed in the output, grant it permission by running the following command:
> winhttpcertcfg -g -c LOCAL_MACHINE\my -s <certificate subject name> -a NetworkService -
If you are planning to forward security events, you will need to grant the NetworkService account access to the Security log. See Forwarding events from the Security log in the NXLog Reference Manual for instructions.
-
Configure the policy on the WEF client to enable event forwarding:
-
Open the Group Policy MMC snap-in (
gpedit.msc) and go to Computer Configuration > Administrative Templates > Windows Components > Event Forwarding.
-
Right-click the Configure target Subscription Manager setting and select Properties. Enable the setting, and under Options click the Show button to add a server address.
-
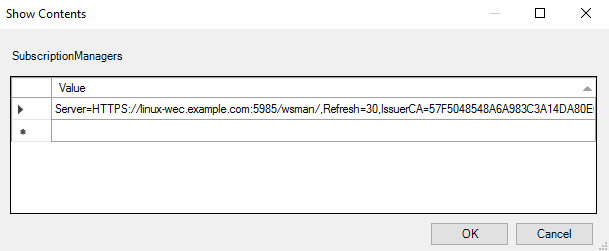
Add at least one setting that specifies the NXLog WEC server. The SubscriptionManager Properties window contains a Help pane that describes the syntax for the setting. If you have used the
gencert-server.shscript the subscription manager string should be in the following format:Server=HTTPS://<FQDN of im_wseventing>:<port>/wsman/,Refresh=<refresh interval in seconds>, IssuerCA=<certificate authority certificate thumbprint>
 Note
NoteOn production systems the Refreshinterval should be set to a higher value e.g.Refresh=1200. -
To find the IssuerCA fingerprint, open the Certificates MMC snap-in, expand Local Computer > Personal > Certificates and open the CA certificate. Copy the
Thumbprintfrom the Details tab. Please make sure to eliminate spaces and the invisible non-breaking space that may be present before the first character of the thumbprint on Windows 2008. -
After the SubscriptionManager setting has been added, ensure the policy is applied by running:
> gpupdate /force
-
-
At this point the WinRM service on the Windows client should connect to NXLog. If the LogConnections directive is set to
TRUEin the NXLog configuration, a connection attempt should be logged innxlog.logand you should start seeing events as they arrive.
Troubleshooting
The steps in this post aim to provide a working example to set up Windows Event Forwarding in practice. However, due to the multitude of components requiring configuration and no two environments being exactly the same, any one of these factors could result in WEF not working as expected. The best way to troubleshoot WEF is to check for errors in Windows Event Log. The following channels provide the most relevant events:
-
Applications and Services Logs/Microsoft/Windows/Event-ForwardingPlugin -
Applications and Services Logs/Microsoft/Windows/Windows Remote Management
For additional resources, the Windows Event Collector (im_wseventing) documentation in the NXLog Reference Manual provides a Troubleshooting section with tips and solutions for common issues.
Summary
In this post we have seen how using WEF with NXLog creates new possibilities for the centralized log collection of events from Windows clients in organizations where Windows servers are rare or non-existent. By using the Windows Event Collector (im_wseventing) module, a WEC server can be set up on GNU/Linux to receive events forwarded to it by Microsoft Windows clients.
With both NXLog and WEF supporting either Kerberos or certificate-based authentication, we hope this post provides you with the information needed for getting started with configuring a WEC server in your environment, according to your organization’s preferred authentication method.