
In my early days as a Junior Sysadmin, I learned the value of automation when tasked with configuring hundreds of Windows XP machines. Yes, there was a version of Windows called XP. Automating large and repetitive tasks saves time and ensures scalability and consistency in IT environments. Scalability has become very important in IT, and in the golden age of automation tools and APIs, what could be a better way to execute the mass deployment and configuration of your log collection tool than using these very mature and available technologies?
This post will show you how to use Ansible to install and enroll agents to NXLog Platform for log collection on thousands of computers with minimal effort. Yes, possibly on thousands of computers or as many as you can imagine.
Use case
Now, let’s consider a real-world scenario where automation saves the day.
Imagine you are an IT admin in an enterprise where you must abide by new compliance regulations for log collection. This compliance requirement dictates that you start collecting login and logout-related events from all computers in the office as soon as possible. You must also store these logs in a central location for a year. Later, you might further need to forward these logs to a SIEM. We are talking about end-user computers, all running Windows operating systems. The pressure is on, and your boss asked you to present a solution on how to go about it.
We will assume that you have already installed NXLog Platform. Let’s list what we need to do and are going to achieve:
-
Install NXLog Agent on the target computers.
-
Have the agents connect automatically to NXLog Platform upon installation.
-
Enroll the agents on NXLog Platform.
-
Assign the agents a configuration template so they start collecting logs.
The above list may seem like a lot to achieve, but with technologies such as Ansible and NXLog Platform’s Agent Management API, it will be easy. So, let’s get to work.
Prerequisites and assumptions
Before proceeding, ensure the following conditions are met.
-
Name resolution — We assume you are working in an environment where DNS is set up and working correctly. Hostnames translate to IP addresses. This is important, as in a typical setting, the target computers likely acquire their IP addresses via DHCP.
-
Control computer — A Linux-based control computer with Ansible installed. See Installing Ansible in the Ansible documentation.
-
NXLog Platform — Installed and configured, and a configuration template was created. See Install NXLog Platform on-premises and Create a configuration template in the NXLog Platform User Guide.
-
Credentials — A domain account or administrative credentials are needed to install NXLog Agent on target computers with Ansible.
-
Windows Remote Management (WinRM) — The Windows Remote Management protocol must be enabled and configured on the target computers.
Environment and file structure
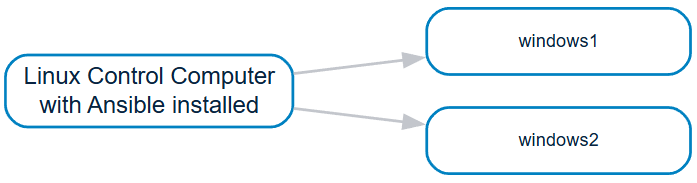
For this use case, I will use a Linux control computer (Linux Mint) and two Windows 10 workstations. It is simple, but for the sake of clarity and since I am a visual person, here is what my setup looks like:
We need to create the following file structure on our Linux control computer, consisting of four files in a single directory:
  ansible/
    deploy_playbook.yml
    enroll_playbook.yml
    inventory
    nxlog_agent.msi
The nxlog_agent.msi file is the NXLog Agent installer.
You need to download it from the NXLog website.
See Download and install NXLog Agent in the NXLog Platform User Guide.
You can either rename the file or update the filename in the Ansible YAML files to match the filename.
I will discuss these files, their purpose, and content below.
Creating the inventory file
The Ansible inventory file is very well documented, but I want to include an example here with a brief explanation. This file holds the details of the target computers, in this case, Windows machines. See How to build your inventory in the Ansible documentation.
The inventory is merely a file that groups our computers into categories.
In our case, we’ll have a larger category called all and a subcategory called windows.
This accommodates the possibility of adding further subcategories later.
We can also see the sections for the individual nodes.
Thus, we can scale this file for as many nodes as we need.
In this case, we are using two hosts: windows1 and windows2.
Having another thousand entries in the file would not affect its operation.
It would work just the same.
all:
  children:
    windows:
      hosts:
        windows1:
          ansible_host: windows1                 (1)
          ansible_user: ansible                  (2)
          ansible_password: YourStrongPassword!  (3)
          ansible_connection: winrm              (4)
          ansible_winrm_transport: basic         (5)
          ansible_port: 5986                     (6)
          ansible_winrm_scheme: https            (7)

        windows2:
          ansible_host: windows2
          ansible_user: ansible
          ansible_password: YourStrongPassword!
          ansible_connection: winrm
          ansible_winrm_transport: basic
          ansible_port: 5986
ansible_winrm_scheme: https| 1 | Hostname of the target computer. |
| 2 | Username that Ansible will use to log in to the target computer. |
| 3 | Password to log in to the target computer. |
| 4 | Connection service for connecting to the target computer. |
| 5 | Connection transport type. |
| 6 | Port for connecting to the target computer (5985 for HTTP, and 5986 for HTTPS). |
| 7 | Connection protocol for connecting to the target computer (HTTP or HTTPS). |
| You can use port 5985 and HTTP as a protocol for testing purposes to avoid setting up SSL certificates. However, you will likely already have certificates configured in a domain environment. |
Installing and connecting NXLog Agent to NXLog Platform
This part joins the first two points we listed in the Use case. The NXLog Agent installation supports automatically configuring the NXLog Platform connection parameters. This greatly simplifies things, as agents will automatically connect to NXLog Platform without you needing to update their configuration manually.
Let’s look at the deploy_playbook.yml file and how it achieves this.
- name: Deploy NXLog Agent and connect to NXLog Platform
  hosts: windows (1)
  tasks:
    - name: Copy NXLog Agent installer to Windows
      ansible.windows.win_copy:
        src: nxlog_agent.msi (2)
        dest: C:\nxlog_agent.msi (3)

    - name: Install and connect NXLog Agent
      ansible.windows.win_package:
        path: C:\nxlog_agent.msi (4)
        state: present
        arguments: > (5)
          /quiet
          NXP_ADDRESS=agents.nxlog.example.com:5515
NXP_AGENT_LABEL=new| 1 | The windows group we defined in the inventory file, meaning that the script will execute the tasks on all computers in this group. |
| 2 | The NXLog Agent installation file to copy from the ansible directory to the target computers. |
| 3 | The directory on the target computers where the installer files will be copied to. |
| 4 | The file to use to install NXLog Agent on the target computer. Since it is already copied there, it is a local directory on the target computer. |
| 5 | The arguments to install NXLog Agent. This is where you define the NXLog Platform connection details. See Connecting to NXLog Platform in the NXLog Agent Reference Manual. |
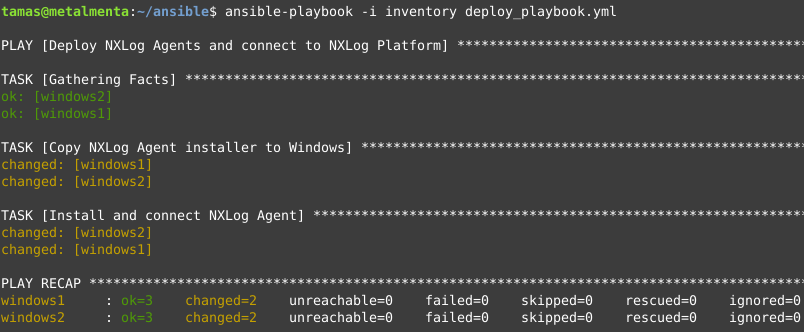
To run the above playbook, execute the following command from your ansible directory.
$ ansible-playbook -i inventory deploy_playbook.ymlAs a a result of running the playbook, NXLog Agent is installed on both computers and connects to NXLog Platform.
This is what Ansible should return on a successful install:
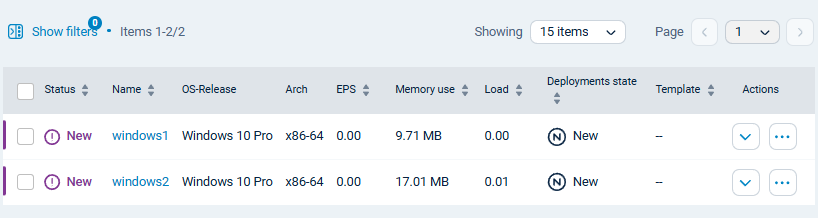
The connected agents on NXLog Platform:
If you need to perform further testing or redo the installation, I have included the script to undo the installation below. The script uninstalls NXLog Agent, cleans up the installation directory, and deletes the installation file, reverting the machine to a clean state.
undeploy-playbook.yml
- name: Remove NXLog Agent and clean up all files
  hosts: windows
  tasks:
    - name: Stop NXLog Agent service
      win_service:
        name: nxlog
        state: stopped
      ignore_errors: yes

    - name: Uninstall NXLog Agent via MSI installer
      win_package:
        path: "C:\nxlog_agent.msi"
        state: absent
      ignore_errors: yes

    - name: Remove NXLog Agent installation directory (including nxlog directory)
      win_file:
        path: "C:\Program Files\nxlog"
        state: absent
        recurse: yes

    - name: Remove NXLog Agent MSI installer
      win_file:
        path: "C:\nxlog_agent.msi"
        state: absent
Enrolling and configuring NXLog Agent
Now, we will use NXLog Platform’s Agent Management API to enroll and configure agents en masse using a single script. For consistency and simplicity, we will continue using Ansible to achieve this using a straightforward operation. We only need to instruct Ansible to run a pre-crafted curl command on the target machines using a variable for the machine name, and Ansible will replace the variable with the hostname it retrieves from the target machine upon execution. Besides this, Ansible automatically provides a report of the successful and unsuccessful agent enrollment operations.
The Agent Management API allows many other possibilities for carrying out bulk operations across your agent fleet. For example, we could have used the inventory file instead of getting the hostname from the Ansible connection. Or, we could have written a bash script to run this curl request and use a local environment variable to get the hostname. The possibilities are endless, and you should adapt this part according to your needs.
To craft our curl command, we need the following details:
-
The Organization ID of our NXLog Platform instance. We need to replace the
{ORG_ID}variable with it. See Finding your organization ID in the NXLog Platform Developer Guide. -
The API token to replace the
{TOKEN}variable. See Generating a token in the NXLog Platform Developer Guide. -
The UUID of the template we want to assign to our agents. We need to replace
{TEMPLATE_UUID}with that. You can get your configuration template UUID in the same way you get your organization ID. Go to Agents > Configuration Overview, then select your template. Once on the template page, you can copy the template UUID from the URL.
This is the actual request we need to pass to the Agent Management API.
curl --verbose --request POST
     --url "https://agents.example.com/api/{ORG_ID}/api/v1/agents/*/enroll/?filter=(hostname='{{ ansible_hostname | lower }}')"
     --header "Authorization: Bearer {TOKEN}"
     --header "Content-Type: application/json"
     --data "{\"templateId\":\"{TEMPLATE_UUID}\"}"
As you can see, it is very straightforward. Now let’s implement this in Ansible.
The curl request is the same as in the example above, but you must include it in a single line in the YAML file.
- name: Enroll and configure NXLog Agent
  hosts: all
  tasks:
    - name: Run the pre-crafted curl command
      win_command: |
       curl --verbose --request POST --url "https://agents.example.com/api/{ORG_ID}/api/v1/agents/*/enroll/?filter=(hostname='{{ ansible_hostname | lower }}')" --header "Authorization: Bearer {TOKEN}" --header "Content-Type: application/json" --data "{\"templateId\":\"{TEMPLATE_UUID}\"}"
To execute the file on all the computers in your inventory file, run the following command on your Linux control computer.
$ ansible-playbook -i inventory deploy_playbook.ymlDo not forget, you have to run your playbooks from your ansible directory.
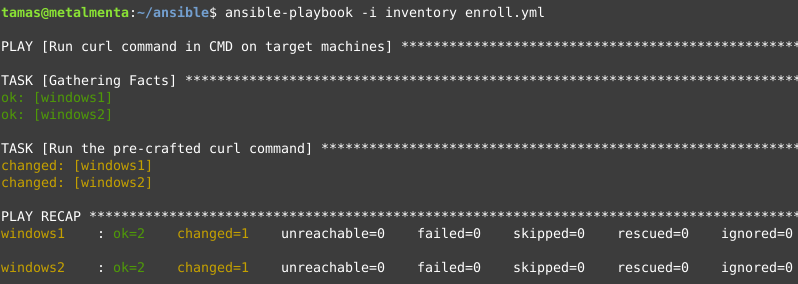
As a result of running the above playbook, the connected agents are enrolled and assigned a configuration template.
This is what Ansible should return on a successful install:
The connected agents on NXLog Platform:

With this, your agents are fully configured and already started collecting logs. You have nothing else to do.
As I did in the previous section, I will include a script to undo the operation carried out in this step.
It sets the agents' persisted field to FALSE, thus disconnecting them from NXLog Platform.
unenroll-playbook.yml
- name: Update agent persisted field using curl
  hosts: all
  tasks:
    - name: Run the curl command to set persisted to false
      win_command: |
        curl --verbose --request PUT --url "https://agents.example.com/api/{ORG_ID}/api/v1/agents/*/persisted/?filter=(hostname='{{ ansible_hostname | lower }}')" --header "Authorization: Bearer {TOKEN}" --header "Content-Type: text/plain" --data "false"
Summary
Collecting logs from many computers doesn’t need to be complex. With the right tools, you can implement a process streamlining agent installation and configuration. In this blog post, I wanted to show you how easy it is to bulk-deploy, enroll, and configure NXLog Agent. I used Ansible to demonstrate the process, but you could easily replace it with any other SCM tool you may be using in your environment. The goal is to make the process efficient, scalable, and repeatable, whether you manage a few or thousands of computers.
I must say, we have come a long way since my Windows XP days!